laravel+react实战打造企业级高并发分布式电商小程序(二)
整体使用laravel7+react打造整个电商小程序。里面会涉及到高并发的知识,mysql的分库分表,主从读写分离的配置,redis集群的使用,缓存系统的使用,队列系统的使用等。
先初始化一个laravel的项目。然后配置好.env文件。
权限管理
既然是电商肯定有后台,要做权限管理这块。
先创建表,这里使用laravel的migration。下面是后台用户表。
1
2
3
4
5
6
7
8
9
10
11
12
13
14
15
16
17
18
19
20
21
22
23
24
25
26
27
28
29
30
31
32
33
34
35
36
37
| <?php
use Illuminate\Database\Migrations\Migration;
use Illuminate\Database\Schema\Blueprint;
use Illuminate\Support\Facades\Schema;
class CreateUsersTable extends Migration
{
public function up()
{
Schema::create('auth_users', function (Blueprint $table) {
$table->bigIncrements('id');
$table->string('name', 100)->unique();
$table->string('email', 100)->unique();
$table->timestamp('email_verified_at')->nullable();
$table->string('password');
$table->rememberToken();
$table->timestamps();
});
}
public function down()
{
Schema::dropIfExists('auth_users');
}
}
|
下面是角色表
1
2
3
4
5
6
7
8
9
10
11
12
13
14
15
16
17
18
19
20
21
22
23
24
25
26
27
28
29
30
31
32
33
34
35
|
<?php
use Illuminate\Database\Migrations\Migration;
use Illuminate\Database\Schema\Blueprint;
use Illuminate\Support\Facades\Schema;
class CreateRolesTable extends Migration
{
public function up()
{
Schema::create('auth_roles', function (Blueprint $table) {
$table->bigIncrements('id');
$table->string('name', 100)->unique();
$table->timestamps();
});
}
public function down()
{
Schema::dropIfExists('auth_roles');
}
}
|
下面是权限表
1
2
3
4
5
6
7
8
9
10
11
12
13
14
15
16
17
18
19
20
21
22
23
24
25
26
27
28
29
30
31
32
33
| <?php
use Illuminate\Database\Migrations\Migration;
use Illuminate\Database\Schema\Blueprint;
use Illuminate\Support\Facades\Schema;
class CreatePermissionsTable extends Migration
{
public function up()
{
Schema::create('auth_permissions', function (Blueprint $table) {
$table->bigIncrements('id');
$table->string('name',100)->unique();
$table->timestamps();
});
}
public function down()
{
Schema::dropIfExists('auth_permissions');
}
}
|
下面是用户角色关联表
1
2
3
4
5
6
7
8
9
10
11
12
13
14
15
16
17
18
19
20
21
22
23
24
25
26
27
28
29
30
31
32
33
34
35
36
|
<?php
use Illuminate\Database\Migrations\Migration;
use Illuminate\Database\Schema\Blueprint;
use Illuminate\Support\Facades\Schema;
class CreateUserRolesTable extends Migration
{
public function up()
{
Schema::create('auth_user_roles', function (Blueprint $table) {
$table->bigIncrements('id');
$table->bigInteger('user_id');
$table->bigInteger('role_id');
$table->timestamps();
});
}
public function down()
{
Schema::dropIfExists('auth_user_roles');
}
}
|
下面是角色和权限关联表
1
2
3
4
5
6
7
8
9
10
11
12
13
14
15
16
17
18
19
20
21
22
23
24
25
26
27
28
29
30
31
32
33
34
35
36
|
<?php
use Illuminate\Database\Migrations\Migration;
use Illuminate\Database\Schema\Blueprint;
use Illuminate\Support\Facades\Schema;
class CreateRolePerimissionsTable extends Migration
{
public function up()
{
Schema::create('auth_role_permissions', function (Blueprint $table) {
$table->bigIncrements('id');
$table->bigInteger('user_id')->default(0);
$table->bigInteger('role_id');
$table->bigInteger('perimission_id');
$table->timestamps();
});
}
public function down()
{
Schema::dropIfExists('auth_role_permissions');
}
}
|
下面这张是系统错误信息表,这里会返回错误信息,这些错误信息全部存放在这张表里。
1
2
3
4
5
6
7
8
9
10
11
12
13
14
15
16
17
18
19
20
21
22
23
24
25
26
27
28
29
30
31
32
33
34
35
|
<?php
use Illuminate\Database\Migrations\Migration;
use Illuminate\Database\Schema\Blueprint;
use Illuminate\Support\Facades\Schema;
class CreateSysErrorsTable extends Migration
{
public function up()
{
Schema::create('sys_errors', function (Blueprint $table) {
$table->bigIncrements('id');
$table->string('code',100)->unique()->comment('错误编码');
$table->string('msg')->comment('错误信息');
$table->timestamps();
});
}
public function down()
{
Schema::dropIfExists('sys_errors');
}
}
|
创建完这些执行迁移命令就可以了。
php artisan migrate
当然了,在这之前确保你的.env文件已经配置好了数据库连接。
我们有了后台数据还需要一个管理员账户,使用seed填充。
1
2
3
4
5
6
7
8
9
10
11
12
13
14
15
16
17
18
19
20
21
22
23
24
|
<?php
use App\Models\Auth\UserModel;
use Illuminate\Database\Seeder;
use Illuminate\Support\Facades\Hash;
class UsersTableSeeder extends Seeder
{
public function run(UserModel $user)
{
$user->name = 'admin';
$user->email = 'admin@admin.com';
$user->password = Hash::make('123456');
$user->save();
}
}
|
运行填充命令
php artisan db:seed
控制器
这里我们使用一个laravel的扩展包,使用composer安装他
composer require thepatter/query-common
安装完后查看我的这个文章来使用这个包,根据文章里面做完之后再回来看下面的内容。
https://blog.csdn.net/Thepatterraining/article/details/105408363
接下来使用artisan命令创建我们的控制器。
php artisan make:queryController Auth/UserController
创建完之后在创建model
php artisan make:model Models/Auth/UserModel
修改刚才的Auth/UserModel,在里面增加table属性。
1
2
3
4
5
6
7
8
9
10
11
12
13
|
<?php
namespace App\Models\Auth;
use Illuminate\Database\Eloquent\Model;
class UserModel extends Model
{
protected $table = 'auth_users';
}
|
修改刚才的Auth/UserController控制器。
1
2
3
4
5
6
7
8
9
10
11
12
13
14
15
16
17
18
19
20
21
22
23
24
25
26
27
28
29
30
31
32
33
34
35
36
37
38
39
40
41
42
43
44
|
<?php
namespace App\Http\Controllers\Auth;
use QueryCommon\QueryController;
use App\Models\Auth\UserModel;
use App\Models\Auth\UserRoleModel;
class UserController extends QueryController
{
protected $dicArr = [];
protected $filedsAdapter = [];
protected $createAdapter = [
'name' => 'name',
'email' => 'email',
];
protected $shortTableName;
protected function getModel() {
$this->model = new UserModel;
return $this->model;
}
}
|
这时候我们对用户的增删改查操作就完成了,是不是超级简单呢。这主要依赖于我们的query-common扩展包。
我们接下来只需要添加对应的路由就可以了。在routes下面创建Api/Auth文件夹。在里面创建index.php路由文件。
1
2
3
4
5
6
7
8
9
10
11
12
13
14
15
16
17
18
19
20
|
<?php
use Illuminate\Support\Facades\Route;
Route::prefix('auth')->namespace('Auth')->group(function () {
Route::post('user', 'UserController@createInfo');
Route::get('users', 'UserController@queryList');
Route::put('user/{id}', 'UserController@updateInfo');
Route::delete('user/{id}', 'UserController@deleteInfo');
});
|
添加完路由文件后我们需要自动加载路由文件,请看我的这篇文章,路由自动加载。
https://blog.csdn.net/Thepatterraining/article/details/105386868
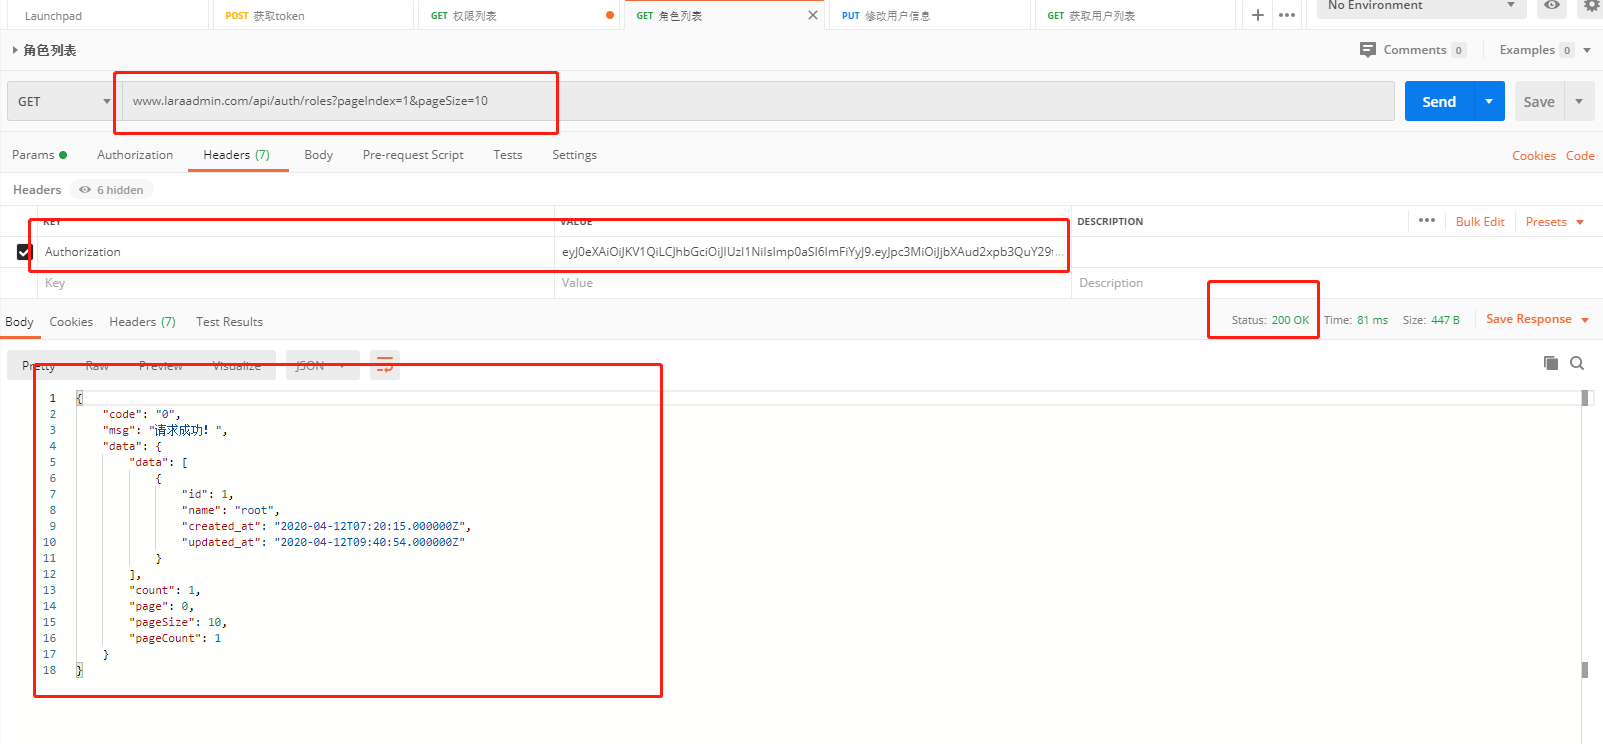
接下来可以使用postman来测试了。
获取用户列表

其他的就不放图了。
角色
有了用户就有角色了,我们的角色表在之前已经创建好了,我们现在同样的方法创建controller和model。
执行下面的命令。-m参数是model,这里指定model后,如果model不存在会自动创建。
php artisan make:queryController Auth/RoleController -m Models/Auth/RoleModel
修改刚才的Auth/RoleModel,在里面增加table属性。
1
2
3
4
5
6
7
8
9
10
11
12
13
|
<?php
namespace App\Models\Auth;
use Illuminate\Database\Eloquent\Model;
class RoleModel extends Model
{
protected $table = 'auth_roles';
}
|
app/Http/Controllers/Auth/RoleController文件内容如下
1
2
3
4
5
6
7
8
9
10
11
12
13
14
15
16
17
18
19
20
21
22
23
24
25
26
27
28
29
30
31
32
33
34
35
36
37
38
|
<?php
namespace App\Http\Controllers\Auth;
use QueryCommon\QueryController;
use App\Models\Auth\RoleModel;
class RoleController extends QueryController
{
protected $dicArr = [];
protected $filedsAdapter = [];
protected $createAdapter = [];
protected $shortTableName;
protected function getModel() {
$this->model = new RoleModel();
return $this->model;
}
}
|
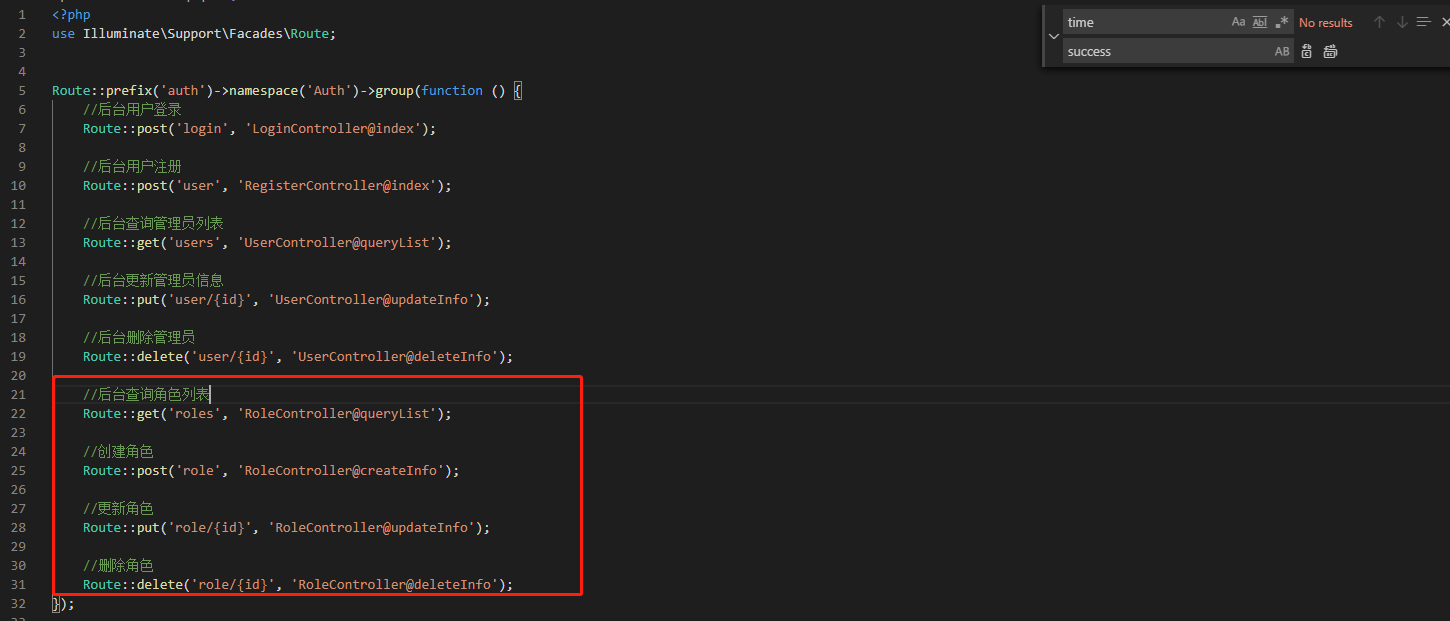
接着在刚才的routes/Api/Auth/index路由文件中增加下面的内容
1
2
3
4
5
6
7
8
9
10
11
12
13
|
Route::get('roles', 'RoleController@queryList');
Route::post('role', 'RoleController@createInfo');
Route::put('role/{id}', 'RoleController@updateInfo');
Route::delete('role/{id}', 'RoleController@deleteInfo');
|
增加后是下图这样
同样使用postman测试。
用户和角色关联
有了用户和角色就要把这两个关联起来了,我们通过在创建用户和修改用户的时候关联角色,在这时候就要更改之前的Auth/UserController了。
增加下面的函数。
1
2
3
4
5
6
7
8
9
10
11
12
13
14
15
16
17
18
19
20
21
22
23
24
25
26
27
28
29
30
31
32
33
34
35
36
37
|
protected function createAfter($id) {
$this->userRole($id);
}
protected function updateAfter($id) {
UserRoleModel::where('user_id', $id)->delete();
$this->userRole($id);
}
private function userRole($id) {
$ids = $this->request->input('roleIds');
$insertDatas = [];
foreach ($ids as $roleId) {
$insertData = [];
$insertData['user_id'] = $id;
$insertData['role_id'] = $roleId;
$insertData['created_at'] = date('Y-m-d H:i:s');
$insertDatas[] = $insertData;
}
UserRoleModel::insert($insertDatas);
}
|
createAfter方法是在创建完用户后执行的,updateAfter方法是更新完用户信息后执行的。传入用户id。我们在这里删除之前的用户和角色关联,把新的循环添加到数组中,一次性插入数据库。因为循环插入会进行多次数据库io操作,而数据库io是比较耗费资源和时间的,所以我们尽可能少进行数据库操作。
在创建和更新时候我们还需要验证参数,我们再添加下面的方法。
1
2
3
4
5
6
7
8
9
10
11
12
13
14
15
16
17
18
19
20
21
22
23
24
25
26
27
28
29
30
31
32
33
34
35
36
37
38
39
40
41
42
43
44
45
46
47
48
49
50
51
52
53
54
55
56
57
58
|
protected function createBefore() {
$rules = [
'name' => 'required|unique:auth_users,name',
'email' => 'required|email|unique:auth_users,email',
'password' => 'required',
'roleIds' => 'required|array',
];
$messages = [
'name.required' => '用户名为必填项',
'name.unique' => '用户已经存在',
'email.required' => '邮箱为必填项',
'email.unique' => '邮箱已经存在',
'email.email' => '请输入正确的邮箱格式',
'password.required' => '密码为必填项',
'roleIds.required' => '角色为必填项',
'roleIds.array' => '角色必须是数组类型',
];
$this->valid($rules, $messages);
$roleNum = RoleModel::whereIn('id', $this->request->roleIds)->count();
if ($roleNum != count($this->request->roleIds)) {
throw new CommonException(ErrorModel::ROLE_NOT_FOUND);
}
}
protected function updateBefore() {
$rules = [
'name' => 'required',
'email' => 'required|email',
'roleIds' => 'required|array',
];
$messages = [
'name.required' => '用户名为必填项',
'email.required' => '邮箱为必填项',
'email.email' => '请输入正确的邮箱格式',
'roleIds.required' => '角色为必填项',
'roleIds.array' => '角色必须是数组类型',
];
$this->valid($rules, $messages);
$roleNum = RoleModel::whereIn('id', $this->request->roleIds)->count();
if ($roleNum != count($this->request->roleIds)) {
throw new CommonException(ErrorModel::ROLE_NOT_FOUND);
}
}
|
createBefore方法在创建用户之前调用,updateBefore方法在更新之前调用,用来验证参数信息。验证角色在数据库中不存在后要返回错误,直接throw抛出异常即可,因为在外部已经用try catch捕获了,这里返回的是一个error code,在Sys/ErrorModel中定义一个错误信息。为了方便管理,所有的错误以常量的方式定义在errorModel里面。真正的错误信息在我们一开始创建的sys_error数据表中。我们在数据表中添加一条错误信息,code是100002的,msg是角色未定义!
1
2
3
|
const ROLE_NOT_FOUND = '100002';
|
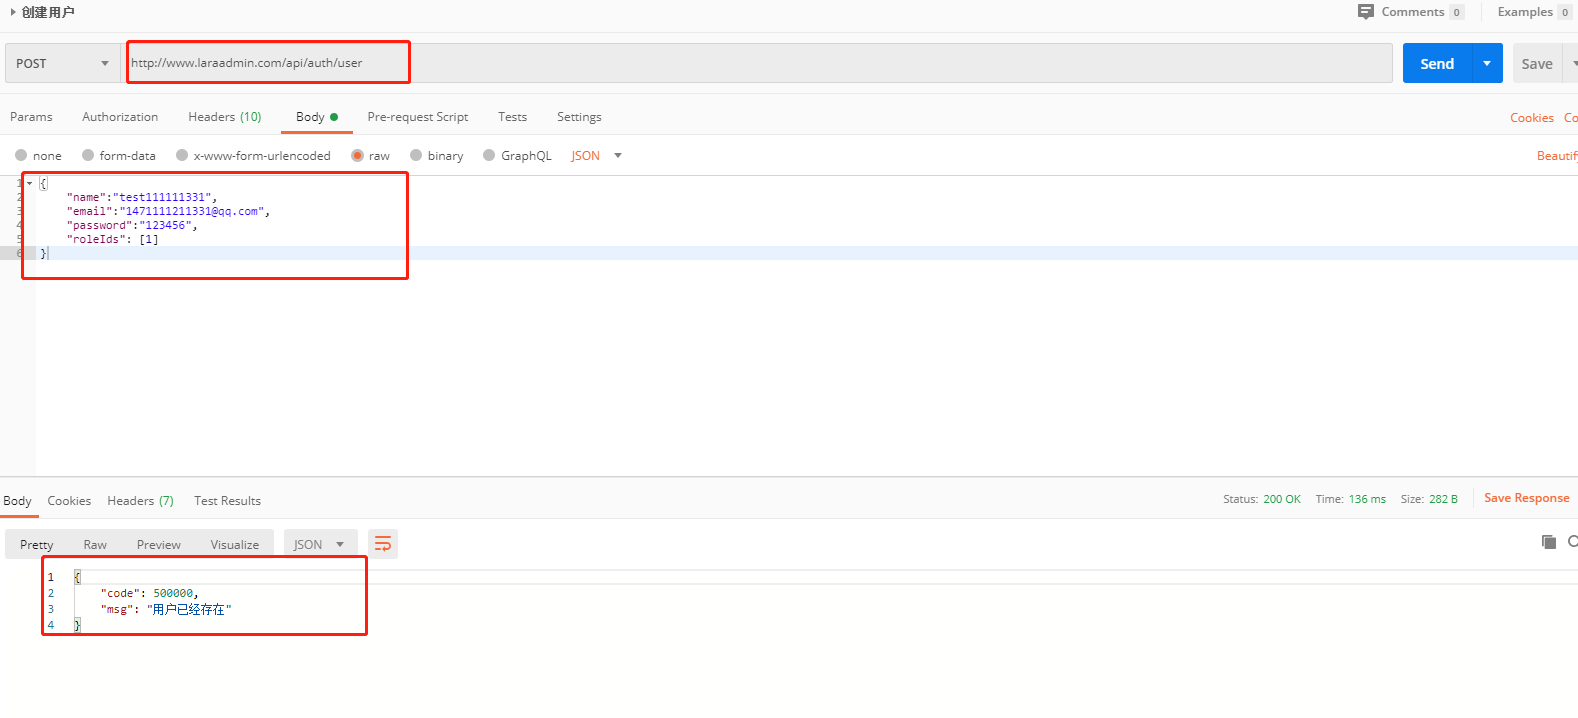
我们可以传一些错误的角色id给到接口中,使用postman来测试一下。因为这个用户已经创建了,所以返回了用户已经存在的错误信息。
权限
我们使用同样的方式创建权限的controller和model。
php artisan make:queryController Auth/PermissionController -m Models/Auth/PermissionModel
和上面一样,修改刚才的Auth/PermissionModel,在里面增加table属性。后面的就不再说这里了。
1
2
3
4
5
6
7
8
9
10
11
12
13
|
<?php
namespace App\Models\Auth;
use Illuminate\Database\Eloquent\Model;
class PermissionModel extends Model
{
protected $table = 'auth_permissions';
}
|
增加路由。
1
2
3
4
5
6
7
8
9
10
11
12
13
|
Route::get('permissions', 'PermissionController@queryList');
Route::post('permission', 'PermissionController@createInfo');
Route::put('permission/{id}', 'PermissionController@updateInfo');
Route::delete('permission/{id}', 'PermissionController@deleteInfo');
|
使用postman测试。

现在呢,我们权限管理的后端接口就算做完了,当然了,后面还会根据需要调整。